Wouldn't have thought of using a skyscraper in a headtexture that's for sure.
C'mon people Enter! I will give 4k to the next 4 people who post a tutorial! 4k just for entering!
C'mon people Enter! I will give 4k to the next 4 people who post a tutorial! 4k just for entering!
Last edited by KungFuJC; Jan 8, 2010 at 10:03 PM.
[GATA Elite #2][PigeonHive]Ldr's
-=[Shop]=-
-=[Shop]=-
Space Balls
1. Make your canvas 1600 x 1300 and fill it with black.
2. Create New Layer--choose the Ellipse Select tool and draw a circle big enough to fit the canvas.
3. On the same layer go to Effects—Selection—Outline
Width=3
Color= 255 for all (white)
4. Then go to Effects—Blur—Gaussian Blur—30px (Use your discretion)
5. Add New Layer and repeat Step 3.
Width=2
Color=White
6. Repeat Step 4, but blur up to 17 px.
7. On a New Layer, repeat Step 6 following the exact same settings (you should have four layers all together). After, go to Blur—Fragment Blur
Fragment count= 3
Fragment distance=41
There was some confusion about Step 7. All you have to do is blur the circle 17 px (ignore the part about Step 4).
Duplicate this Fragment Layer 3-4 times and merge them all together.
8. Right above the Background Layer, Create a New Layer. Draw a circle (a bright color) just the same size as the ones above. This will be used to select the outside of the circle instead of drawing new ones each time. You should deselect the layer.
9. Right above the “Step 8” layer, create a New Layer.
10. Click the “Step 8” layer and using the Magic Wand tool, click on the inside of the circle. Now, click on the "Step 9" layer and using your radial gradient tool, run it just slightly below the middle of the circle.
11. With the circle still selected, create a New Layer above the “Step 9" layer and draw two lines at the bottom of the circle. The lines should be around 20 px and lighter in color than the “Step 9” layer. Draw the same lines for the top of the circle.
12. Duplicate Layer 7 and move it down(the one with the lines). Go to –Adjustments—Black and White—Brightness/Contrast. Brightness and Contrast should both be 100.
13. Select the second Layer 7 and move the selected pixels just slightly below the "Step 11" layer. You should blur both Layer 7's using Gaussian Blur at 1 px.
You might also notice that the white lines may be protruding from the sides. Just go to “Step 8" layer and select the outside of it. Go to the second Layer 7 and press Delete.
14. Create a New Layer above the first Layer 7. With the circle still selected, choose Ellipse Select and Selection Mode should be: Subtract.
15. Set your primary color to white and secondary to transparent. Using the linear gradient tool, draw in the highlight starting from the left side. Go to Effects—Blur—True Blur=1.64
16. Go back to the second Layer 7. Keep the circle selected. Gaussian Blur the white lines at around 7px. If you’d like more glow, just go to about 10 px.
17. On a New Layer above bottom white highlight, use the same method for the bottom highlight as done in Steps 14 and 15.
DON’T FORGET TO TRUE BLUR!
18. Right above Layer 7, create a New Layer. It should be Layer 11. Draw in circles using the Ellipse Tool with Draw Filled Shape selected.
You might need to do larger circles on a separate layer and smaller ones on another. I did larger one on Layer 11 and smaller circles on Layer 12. Duplicate both layers and move them below the original ones and make them glow using either Gaussian blur or Photo—Glow.
19. Above Layer 10 (for me, this is Layer 13), use the Select Ellipse tool and create a smaller circle at the top and draw in four lines using the line tool of about 9 px or so. The ellipse select tool will help you keep all of the lines uniform.
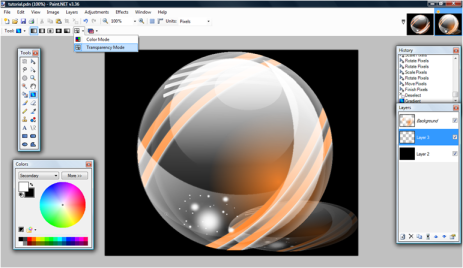
20. Now, go to the gradient tool and select it. Make sure both of your primary and secondary colors are solid in the Colors Window. Then, select Linear gradient and then Transparency Mode. (don’t forget to smooth the lines out using True Blur at about 1.64 px)
21. Add New Layer right above Layer 13 (the four lines). In your colors window, choose White as Primary and Transparent as Secondary. With your Ellipse Select Tool, draw in the circle down to the middle of the circle. Move your gradient tool from top to bottom. Add a New Layer and draw in a smaller circle and repeat the gradient motion. **REMEMBER: Use True blur of 1.64 radius SEPARATELY!!!
22. Finally, with your magic wand tool select the “Select Circle.” Go to the top most layer and create New Layer (this should be the very first layer in this project). Repeat the same Gradient motion from top to bottom.
Your result should be similar to this:

Flatten all layers except for the Background layer. After it’s flattened, add the black layer again.
For the shadow of the ball, skew it down and use the Transparency mode to make it look transparent.
***Sorry for the lack of pics***
1. Make your canvas 1600 x 1300 and fill it with black.
2. Create New Layer--choose the Ellipse Select tool and draw a circle big enough to fit the canvas.
3. On the same layer go to Effects—Selection—Outline
Width=3
Color= 255 for all (white)
4. Then go to Effects—Blur—Gaussian Blur—30px (Use your discretion)
5. Add New Layer and repeat Step 3.
Width=2
Color=White
6. Repeat Step 4, but blur up to 17 px.
7. On a New Layer, repeat Step 6 following the exact same settings (you should have four layers all together). After, go to Blur—Fragment Blur
Fragment count= 3
Fragment distance=41
There was some confusion about Step 7. All you have to do is blur the circle 17 px (ignore the part about Step 4).
Duplicate this Fragment Layer 3-4 times and merge them all together.
8. Right above the Background Layer, Create a New Layer. Draw a circle (a bright color) just the same size as the ones above. This will be used to select the outside of the circle instead of drawing new ones each time. You should deselect the layer.
9. Right above the “Step 8” layer, create a New Layer.
10. Click the “Step 8” layer and using the Magic Wand tool, click on the inside of the circle. Now, click on the "Step 9" layer and using your radial gradient tool, run it just slightly below the middle of the circle.
11. With the circle still selected, create a New Layer above the “Step 9" layer and draw two lines at the bottom of the circle. The lines should be around 20 px and lighter in color than the “Step 9” layer. Draw the same lines for the top of the circle.
12. Duplicate Layer 7 and move it down(the one with the lines). Go to –Adjustments—Black and White—Brightness/Contrast. Brightness and Contrast should both be 100.
13. Select the second Layer 7 and move the selected pixels just slightly below the "Step 11" layer. You should blur both Layer 7's using Gaussian Blur at 1 px.
You might also notice that the white lines may be protruding from the sides. Just go to “Step 8" layer and select the outside of it. Go to the second Layer 7 and press Delete.
14. Create a New Layer above the first Layer 7. With the circle still selected, choose Ellipse Select and Selection Mode should be: Subtract.
15. Set your primary color to white and secondary to transparent. Using the linear gradient tool, draw in the highlight starting from the left side. Go to Effects—Blur—True Blur=1.64
16. Go back to the second Layer 7. Keep the circle selected. Gaussian Blur the white lines at around 7px. If you’d like more glow, just go to about 10 px.
17. On a New Layer above bottom white highlight, use the same method for the bottom highlight as done in Steps 14 and 15.
DON’T FORGET TO TRUE BLUR!
18. Right above Layer 7, create a New Layer. It should be Layer 11. Draw in circles using the Ellipse Tool with Draw Filled Shape selected.
You might need to do larger circles on a separate layer and smaller ones on another. I did larger one on Layer 11 and smaller circles on Layer 12. Duplicate both layers and move them below the original ones and make them glow using either Gaussian blur or Photo—Glow.
19. Above Layer 10 (for me, this is Layer 13), use the Select Ellipse tool and create a smaller circle at the top and draw in four lines using the line tool of about 9 px or so. The ellipse select tool will help you keep all of the lines uniform.
20. Now, go to the gradient tool and select it. Make sure both of your primary and secondary colors are solid in the Colors Window. Then, select Linear gradient and then Transparency Mode. (don’t forget to smooth the lines out using True Blur at about 1.64 px)
21. Add New Layer right above Layer 13 (the four lines). In your colors window, choose White as Primary and Transparent as Secondary. With your Ellipse Select Tool, draw in the circle down to the middle of the circle. Move your gradient tool from top to bottom. Add a New Layer and draw in a smaller circle and repeat the gradient motion. **REMEMBER: Use True blur of 1.64 radius SEPARATELY!!!
22. Finally, with your magic wand tool select the “Select Circle.” Go to the top most layer and create New Layer (this should be the very first layer in this project). Repeat the same Gradient motion from top to bottom.
Your result should be similar to this:

Flatten all layers except for the Background layer. After it’s flattened, add the black layer again.
For the shadow of the ball, skew it down and use the Transparency mode to make it look transparent.
***Sorry for the lack of pics***
PigeonHive Flap Buzz


